 Tutorial 3
In the 3rd part of the tutorial, we will discuss about the parts of the layer panel in the right side of your screen.
Tutorial 3
In the 3rd part of the tutorial, we will discuss about the parts of the layer panel in the right side of your screen.
In this part, it controlls your layers and sets other options for your output.
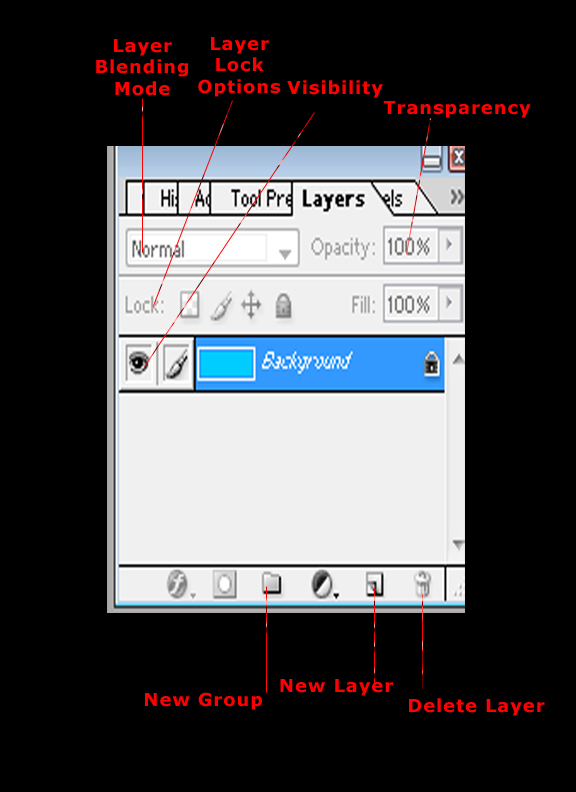
Layer Blending Options
In Photoshop and Elements the layer blend modes can be changed in the layers palette.
The rest of the modes interact with each other in different ways.In these programs, changing the layer blend mode affects the entire layer, even if you have a selection.
In Illustrator the blend modes work basically the same, but a different blend mode may be applied to different objects on the same layer, so the blend mode popup is found in the transparency palette.
The dropdown menu contains the blend modes which we'll discuss fully in a minute.
Normal is the default, and the objects interact with each other as if they were both solid color objects, at 100% opacity. When one is over the other, what is covered you can't see.
Normal Mode
Normal mode is the default. The colors of the two layers will not interact in any way, and it will display the full value of the colors in layer 1.
Dissolve
Dissolve makes the lower layer take on the colors of the top layer, and how much depends on the opacity of the upper layer. The layer 1 opacity is set at 50% here.
Multiply
Multiply darkens the lower layer based on the darkenss of the upper layer. No part of the image will get lighter. Any applied tone darker than white darkens the lower layer. White becomes transparent.
Color Burn
Color Burn burns in the color of the upper layer with the lower layer. No part of the image will get lighter.
Linear Burn
Linear Burn works like multiply but the results are more intense.
Lighten
Lighten compares the two layers pixel for pixel and uses the lightest pixel value. No part of the image gets darker.
Screen
Screen brightens by lightning the lower layer based on the lightness of the upper layer. The result is always lighter, and makes it a good mode for correcting exposure in photos that are too dark.
Color Dodge
Color Dodge dodges the lower layer with the upper layer, resulting in a lighter image. No part of the image will be darkened.
Linear Dodge
Linear Dodge works like screen but with more intense results.
Overlay
Overlay multiplies the light colors and screens the dark colors.
Soft Light
Soft Light will multiply the dark tones and screen the light tones.
Hard Light
Hard Light muliplies the dark colors and screens the light colors.
Vivid Light
Vivid Light will dodges or burn the lower layer pixels depending on whether the upper layer pixels are brighter or darker than neutral gray. It works on the contrast of the lower layer.
Linear Light
Linear Light is the same as Vivid light but it works on the brightness of the lower layer.
Pin Light
Pin Light changes the lower layer pixels depending on how bright the pixels are in the upper layer. It acts like Multiply when the upper layer color is darker than neutral gray, and acts like screen if the upper layer color is lighter than neutral gray.
Difference
Difference reacts to the differences between the upper and lower layer pixels. Large differences lighten the color, and small differences darken the color.
Exclusion
Exclusion uses the darkness of the lower layer to mask the difference between upper and lower layers.
Hue
Hue changes the hue of the lower layer to the hue of the upper layer but leaves brightness and saturation alone.
Saturation
Saturation changes the saturation of the lower layer to the hue of the upper layer but leaves brightness and hue alone.
Color
Color changes the hue and saturation of the lower layer to the hue and saturation of the upper layer but leaves luminosity alone.
Luminosity
Luminosity changes the luminosity of the lower layer to the liminodity of the upper layer while leaving hue and saturation the same.